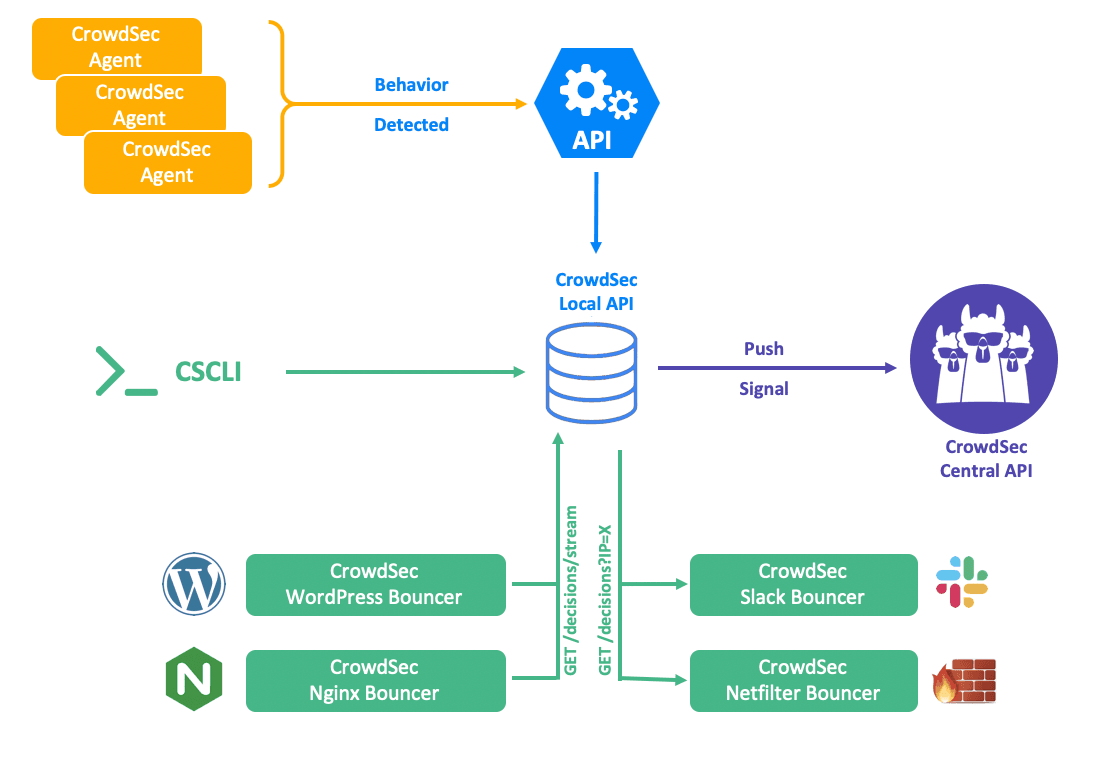
Since v1.0.x was released, CrowdSec can now secure has implemented a Local API that can be requested by the CrowdSec agent or command line client, but also by remote CrowdSec machines. Let’s deep dive and explore how it works and how to make the most of it.
This post is the English version of an article written by our partner Korben. The source can be found here.
What can the API do?
The Local API allows several things. First of all, it allows bouncers (which are the watchdogs of your server if you prefer and which send data to be blocked to your Firewall, WordPress, Nginx…etc.) to simply consult the list of decisions in place. “Decision” here has the same meaning as “rule”.
So what is a “decision” in the context of CrowdSec? Well, it’s simply blocking rules by IP, by IP range, by username or whatever you want since it’s possible to customize. For this to work, the bouncer needs an API key generated by CrowdSec that allows it to consult the list of decisions in place.
If you want to go further, with the command line client or your own scripts or code, you can also act on the API in “write” mode. That is to say, delete or add decisions, push alerts, search or retrieve alerts, but also delete them. To do this, you will need to authenticate to the API with a machine ID and password.
How to use the API?
Let’s assume that CrowdSec is in place and that you can use the command line client (CLI).
Authenticate on the API
To authenticate to the API you need to generate a key for the bouncer. Most of the bouncers offered on the CrowdSec hub have an installation script that does this for you. However, if you develop your own bouncer, here is how to get a key:
cscli bouncers add BouncerdeTest
This will then give you an API key that you will need to specify in your Bouncer configuration.

If it’s a machine you want to register, you can do it in 2 different ways. The simplest is to use the following command:
cscli machines add MachinedeTest –auto
This will generate a login and password for you in a yaml config file which you can then use.

This is in the case where you are only running locally on the same machine. Now if you are on a remote machine, you need to register your API server like this:
cscli lapi register -u Then validate the addition of the machine, this time on the server where the Local API is located.
cscli machines validate MachinedeTestThen to list the registered machines, simply do:

Use the API via a bouncer
Now to establish a connection with the API, well as with all APIs, HTTP request (you can enable HTTPS if you work with several machines. No need to do so if you are running only locally.

Regarding calls to the API from a Bouncer, 2 ways are available.
Query Mode (getDecisions)
Query mode allows the bouncer to query the API to retrieve information about decisions made about certain IP ranges, individual IPs, usernames…etc.directly to CrowdSec’s global reputation database, without having to install an agent on your machine if you don’t wish to. Here is how to call the API (with Curl) to request information about a banned IP:
curl -H "X-Api-Key: e73e3672427ecd8cd9a6487f7e8f4f03" http://localhost:8080/v1/decisions?ip=98.65.32.47As you can see, we pass the API key and invoke the ?ip parameter to specify the IP address we want to get info on. And the response returned will be in JSON format:
[{"duration":"2h25m47.212560128s","id":1023,"origin":"cscli","scenario":"manual 'ban' from '939972095cf1459c8b22cc608eff85daEb4yoi2wiTD7Y3fA'","scope":"Ip","type":"ban","value":"1.2.3.4"}]You can also use the ?range parameter to specify a network range, or if you wish, the scope + value parameter pair to request info on a specific username, session ID…etc.
curl -H "X-Api-Key: e73e3672427ecd8cd9a6487f7e8f4f03" http://localhost:8080/v1/decisions?scope=username&value=korbenStream Mode (getDecisionsStream)
The stream mode works in a slightly different and more basic way, as it allows the bouncer to retrieve existing or new decisions at regular intervals. When the bouncer is launched, you can, for example, retrieve active decisions, but also freshly deleted ones by invoking the API with the ?startup parameter set to “true”:
curl -s -H "X-Api-Key: e73e3672427ecd8cd9a6487f7e8f4f03" http://localhost:8080/v1/decisions/stream?startup=trueThis plugin is released under MIT, the most permissive and free license in the world. Its source code is fully available By setting the ?startup parameter to false, you will then only retrieve new decisions that arrived after the bouncer was started.
{  "deleted": null,
  "new": [
  {
    "duration": "3h59m57.641708614s",
    "id": 2410,
    "origin": "cscli",
    "scenario": "manual 'ban' from '939972095cf1459c8b22cc608eff85daEb4yoi2wiTD7Y3fA'",
    "scope": "Ip",
    "type": "ban",
    "value": "3.3.3.4"
    }
  ]
}
If no decision has been added, the answer will be “null”:
{
  "deleted": null,
  "new": null
}Use the API via a Watcher (cscli or the CrowdSec agent)
As mentioned in the introduction, you will have to provide the API with a machine ID and a password. The use of certain functions of the API in writing (POST / DELETE) or in consultation (GET) is mainly done via the command line interface or the CrowdSec agent, but nothing prevents you from using it directly.

For example to delete one or more decisions concerning a specific IP:
curl -X DELETE "https://localhost:8080/v1/decisions?ip=98.65.32.47" -H "accept: application/json"And in response, you will receive a string telling you how many decisions have been deleted. For those who want to get started with the code, the CrowdSec Github contains code written in Go that shows how to connect and exploit the API.

All API methods are available here.
Conclusion
As you can see, CrowdSec’s Local API is quite easy to learn, and creating a specific bouncer is affordable. A bouncer written in Go and adaptable to your specific needs is also available here, in addition to specific bouncers for Nginx, WordPress, HAProxy, iptables, nftables or even Amazon (AWS) and Google (Network FW and Cloud Armor) cloud firewalls, the sources of which can also be found on Github. You can also find a bouncer in LUA and another in PHP here. And of course, you can find all the information you need on the CrowdSec website.


